Как редактировать CSS сайта WordPress
Вступление
Изменить оформление сайта, можно в файлах активной темы WordPress, а именно в файле под названием style.css. Это простой текстовой файл в расширении CSS. Переводится CSS как Cascading Style Sheets — каскадные таблицы стилей. Согласен, перевод мало о чем говорит. Какими способами можно редактировать CSS сайта WordPress пойдет речь далее.
CSS это
С одной стороны CSS это расширение текстового файла. С другой стороны CSS это язык программирования, на котором пишется это файл. С третьей стороны CSS это свод правил для задания шрифта, цвета сайта, относительного расположения блоков сайта (влево, центр, право, отступы от верха и низа) и других представлений внешнего вида страниц сайта, которые в этом файле и прописаны.
Сразу замечу, файлы CSS могут иметь пугающие размеры, но в них нет ничего сложного. Это очень простые, хотя и разнообразные, правила, написанные в простом синтаксисе.
Я не собираюсь обучать основам CSS, это отлично делают на специальных сайтах. Нам понадобиться только справочник HTML: http://htmlbook.ru/.
Также замечу, что запоминать все правила CSS наизусть совершенно не обязательно. Достаточно понимать синтаксис написания правил CSS. Этого достаточно, чтобы редактировать файл CSS, да и справочник всегда поможет. Главное знать, что править и как править. Кроме справочника есть инструменты в браузерах, о них чуть ниже, которые позволяют редактировать CSS онлайн.
Где лежит файл style.css WordPress
Несколько прописных истин:
- Каждая тема WordPress имеет свой файл определяющий ее внешний вид.
- Редактирования файла style.css одной темы не затрагивает другие темы установленные на сайт;
- Перед редактированием любых файлов активной темы, сделайте резервную копию сайта, на случай фатальных ошибок редактирования и возвращения сайту рабочего состояния.
А лежит файл style.css WordPress в папке с темой (шаблоном) WP. Полный адрес, одинаков для всех тем: wp-content/themes/название_темы/style.css.
Три способа редактировать CSS сайта WordPress
Предложу три варианта редактирования файла style.css.
Редактирование из панели администратора
Вам, наверное, известно, что система WordPress имеет внутренний редактор файлов установленных тем. Войти в него можно из консоли сайта через вкладку: Внешний вид→Редактор.
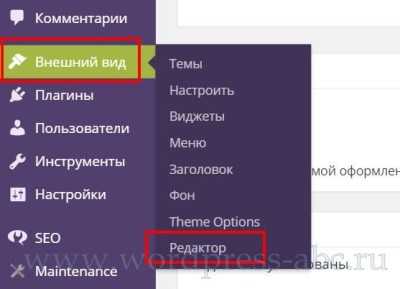
Справа вы видите список файлов темы, в поле редактора открывается содержимое файлов. Если у вас установлено несколько тем, обратите внимание на правый верхний угол. Там есть поле выбора темы. По умолчанию откроется активная тема, но редактировать можно любую установленную тему без её активации.
Совет: Ошибки в редактировании style.css не могут обрушить сайт, вы можете изуродовать только внешний вид. Поэтому, перед прямым редактированием из консоли можно обойтись без резервной копии сайта, достаточно сделать копию самого файла style.css и в случае неудачного редактирования вернуть файлу прежний вид.
Редактирование файла style.css по FTP
Говорят, что есть хостинги, которые не поддерживают редактирование файлов темы из административной панели сайта. Не беда. Можно и на самом деле это правильно, редактировать файл style.css по FTP. Правильно, потому что безопасно и у вас всегда есть оригинальная копия файла.
- Входите в каталог сайта по FTP;
- Добираетесь до wp-content/themes/название_темы/style.css и копируете его на компьютер;
- Далее редактируете его в текстовом редакторе типа Notepad++, сохраняете, оставляя оригинальную копию, и заливаете обратно в каталог. Согласен, немного дольше, но безопаснее и удобнее. Можно спокойно почитать файл и не спеша разобраться с его синтаксисом.
Оба способа редактирования относятся к прямому редактированию, «живого» файла активной темы. У прямого редактирования есть большой недостаток: при обновлении темы все ваши изменения потеряются и тема примет исходный внешний вид.
Дочерняя тема WordPress
Система WordPress позволяет создавать дочерние темы, для родительской активной темы. Дочерняя тема может полностью быть копией родительской темы или с помощью функции import, «забирать» и переопределять стиль родительской темы. То есть, после создания и активации темы наследницы редактируется файл style.css дочерней темы и изменения не пропадают после обновления шаблона. О дочерней теме я писал подробную статью: Зачем нужна дочерняя тема WordPress.
На этом принципе основан и третий способ редактирования стилей.
Редактирование файла style.css с помощью плагинов
Есть несколько плагинов для улучшения редактора файлов темы. Для редактирования стилей мне нравится плагин Jetpack. О плагине я писал подробную статью: Плагин Jetpack заменит 33 плагина WordPress. Плагин очень большой и для редактирования стилей темы нужно активировать модуль Custom CSS.
После его активации в меню консоли в пункте Внешний вид появляется вкладка «Редактировать CSS».
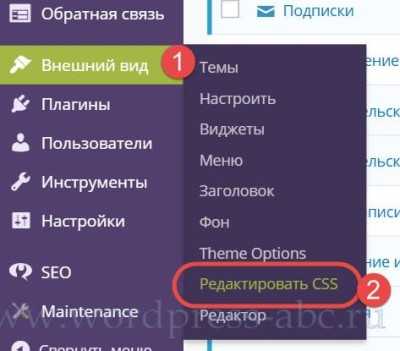
Теперь не нужно редактировать style.css напрямую, достаточно вписать кусок кода css в поле редактора и изменения появятся на сайте. Причем при обновлении темы они не потеряются.
Как понять, что нужно редактировать
Если вы бегло не читаете CSS нужно воспользоваться онлайн инструментами, для чтения CSS и понять, что нужно редактировать.
Самый простой инструмент, это инструмент в любом браузере: «Просмотр кода элемента» в Chrom. В других браузерах название похожее. Доступ к инструменту через правую кнопку мыши или короткими клавишами (Ctrl+Shift+I).
Показываю, как им пользоваться:
Например, хотим поменять заголовок сайта.
- Наводим на него мышь, через правую кнопку открываем «Код элемента»;
- Видим код HTML в правом поле и код CSS в левом поле;
- Можно «наживую» поиграть с кодом CSS и сразу посмотреть, как это выглядит;
- Чтобы открыть CSS в основном поле, жмем на название файла CSS (на фото цифра 2).
Для примера, я поменял онлайн размер шрифта названия.
Но это еще не все.
- Нашли нужный кусок кода css;
- Копируем его;
- Переносим в текстовой редактор;
- Редактируем и переносим кусок кода в style.css дочерней темы или в поле редактора Jetpack.
- Таким образом, меняем любые стили активной темы.
Полезные ссылки
©www.wordpress-abc.ru
Другие статьи раздела: CMS WordPress
Похожие посты:
Как редактировать CSS в WordPress.Изменение CSS стилей в WordPress.Как добавить CSS в WordPress
Здравствуйте, друзья! В этом уроке мы поговорим о том, как в WordPress можно добавить свои CSS стили или изменить существующие.
Замечу, что данных урок рассчитан в большей степени для тех, кто уже имеет базовые знания в использовании CSS стилей. И так, давайте начнем!
Способ №1
1. Заходим в административное меню и переходим в Внешний вид -> Редактор.
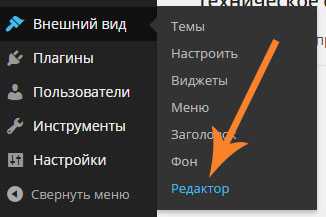
2. В открывшейся странице по умолчанию будет открыто окно редактирования стилей вашей темы (шаблона). После того как вы добавите свои новые стили или измените уже существующие, не забудьте сохранить изменения нажав кнопку
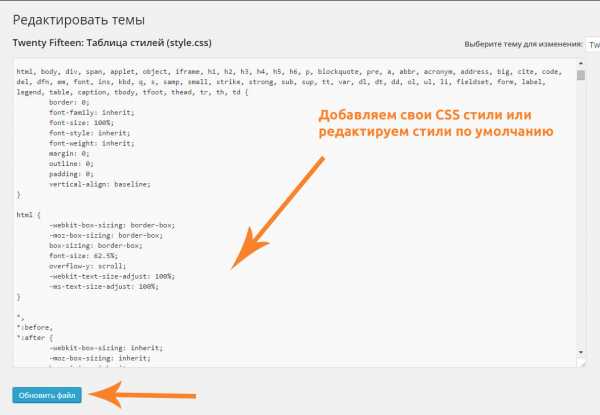
Как видите, с административной панели всего за несколько кликов можно добраться до стилей вашего шаблона WordPress.
Способ №2
Для редактирования стилей этим способом нам нужно:
1. Найти файл style.css в корне папки вашей активированной темы (шаблона).
Путь к файлу: wp-content\themes\название_вашей темы\style.css
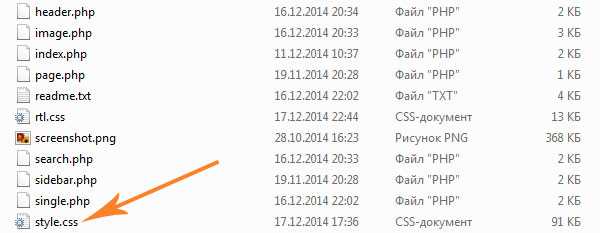
2. Открываем с помощью текстового редактора (я пользуюсь Notepad++) файл style.css и вносим необходимые изменения.
3. После того как внесете все необходимые правки в стилях не забудьте сохранить файл style.css.
Редактирование таким способом актуальнее всего если сайт размещен на локальном сервере. В таком случае, вам не нужно будет каждый раз обновлять страницу редактирования CSS стилей в административном меню после каждого изменения.
Согласитесь, проще и быстрее нажать Ctrl+S в текстовом редакторе и сразу смотреть изменения на сайте, чем после каждого обновления стилей пересохранять страницу в административном меню.
Если у вас что-то не получилось или возникли вопросы, смело пишите в комментариях!
Здравствуйте, друзья! В этом уроке мы поговорим о том, как в WordPress можно добавить свои CSS стили или изменить существующие. Замечу, что данных урок рассчитан в большей степени для тех, кто уже имеет базовые знания в использовании CSS стилей. И так, давайте начнем! Способ №1 1. Заходим в административное меню и переходим в Внешний вид -> Редактор. 2. В открывшейся странице по умолчанию будет открыто окно редактирования стилей вашей темы (шаблона). После того как вы добавите свои новые стили или измените уже существующие, не забудьте сохранить изменения нажав кнопку «Обновить файл». Как видите, с административной панели всего за несколько кликов можно…
Проголосуйте за урок
100Оценка
Итог : Уважаемые читатели! Не поленитесь проголосовать и оставить комментарий. Таким образом я смогу понять полезность уроков и статей, и улучшить их качество в будущем. Заранее спасибо!
wp-lessons.com
Как безопасно добавлять кастомные CSS стили для плагинов и тем на WordPress
С вами когда-то такое случалось? Вы установили плагин, у него были все нужные вам функции. Но… он некрасиво выглядел. Даже после того, как вы поменяли все настройки, он всё равно не вписывается в стиль вашей темы. И даже если он идеально работает, вы немного огорчились или начали искать другой плагин.


Если случалось, то вы наверняка могли бы исправить ситуацию, использовав кастомные CSS стили для вашего плагина. Кастомные CSS стили позволяют вам менять внешний вид ваших плагинов, даже если разработчики не предусмотрели такую опцию.
Смотрите также:
Эта статья покажет вам, как правильно добавлять такие стили, чтобы они всегда были в безопасности, даже если вы меняете или обновляете тему.
Кастомный CSS — больше контроля над дизайном плагинов
Кастомные CSS стили позволяют вам менять внешний вид плагинов. Сейчас стиль большинства премиум плагинов можно редактировать, но в бесплатных плагинах зачастую нет этой функции.
Возьмём, к примеру, один из наиболее популярных плагинов Contact Form 7. Его стиль можно изменить только слегка. Но используя кастомный CSS, вы можете полностью изменить каждый аспект его отображения на экране.
К тому же, даже плагины с предусмотренной возможностью изменения внешнего вида не позволят изменить каждый элемент.
Так что, изучив немного CSS и как его безопасно добавить к вашей теме, вы выйдете на новый уровень отображения плагинов читателям.
Почему важно добавить кастомный CSS правильно
Вы не хотите как попало добавить CSS стили к плагину. Есть правильный и неправильный способ добавить CSS на WordPress.
Когда вы добавляете CSS стили правильно, они всегда будут работать корректно, даже если вы обновите вашу тему. Вы сможете просто скопировать и вставить их в новую тему, если вы когда-либо решите сменить дизайн.
С другой стороны, добавив их неправильно, вы рискуете потерять стили при обновлении или смене темы.
А сейчас мы расскажем вам, как правильно добавлять CSS стили плагинов для Divi и других тем WordPress.
Куда добавлять CSS стили в теме Divi
Для начала рассмотрим процесс добавления кастомных стилей CSS на примере темы Divi.
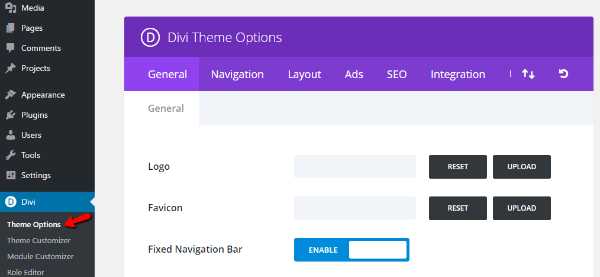
Для безопасного добавления CSS стилей для ваших плагинов в Divi, зайдите во вкладку «Theme Options» в вашем меню Divi:
Потом во вкладке «General» нужно пролистать страницу до конца вниз. Там вы найдёте окошко «Custom CSS»:
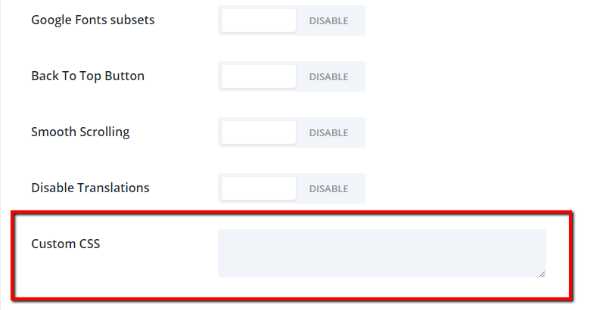
Технически, всё, что вам нужно сделать, это ввести ваш кастомный код CSS и нажать «Save Changes». Но поскольку мы хотим сделать так, чтобы можно было легко перемещать и копировать стиль нашего плагина, то давайте сделаем еще один шаг.
Вы, наверное, уже добавили кастомные Divi CSS сниппеты, они помогают настроить кастомный CSS в этом окне. Для этого вы можете добавить комментарий типа «Плагин CSS стилей начинается тут». Тогда добавьте ваш CSS код под этой строчкой.
Чтобы добавить такой комментарий, нужно скопировать и вставить этот код:
/* Plugin CSS Styles Start Here */
Комментарий ни на что не повлияет, но поможет организовать разные кастомные CSS стили. Divi поможет сохранить ваши пользовательские CSS стили в безопасности во время обновлений так, что вам не нужно бояться потерять их.
Куда добавлять CSS стили для других тем
Если вы используете другую тему, то вы наверняка захотите добавить свои CSS стили в таблицу стилей вашей дочерней темы. Если вы не используете дочернюю тему, или не знаете что это, то мы советуем создать её и начать использовать.
Предположим, что вы установили дочернюю тему, вы можете менять её в консоли WordPress, зайдя во Внешний вид → Редактор:
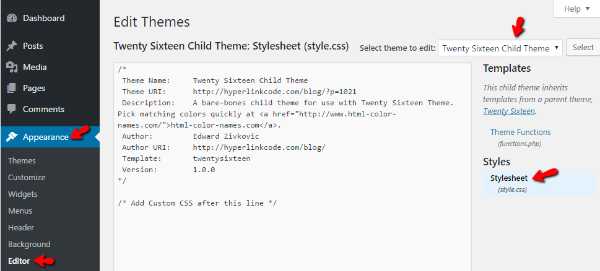
Убедитесь, что вы редактируете верную дочернюю тему. Вам нужно зайти в style.css. Для этого просто нажмите на этот пункт.
Потом вам нужно просто добавить ваш кастомный CSS так же, как мы это сделали в Divi. Для начала, добавьте комментарий:
/* Plugin CSS Styles Start Here */
Далее добавьте ваш кастомный CSS стиль под этой строкой:
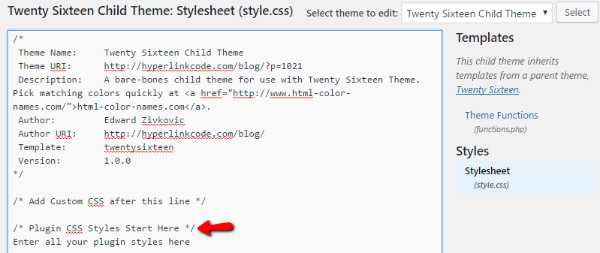
Поскольку вы работаете с дочерней темой, ваши стили всегда будут в безопасности, даже если вы обновите тему.
Реальный пример: Contact Form 7
Давайте рассмотрим реальный пример. Представим, что вы хотите изменить стиль формы обратной связи Contact Form 7. Вы установите плагин и получите похожую форму:
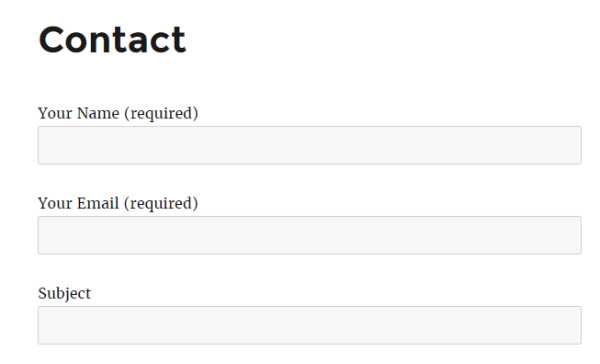
Теперь вы хотите оживить её немножко, добавив чёрные границы в полях формы. Вы можете зайти в таблицу стилей вашей дочерней темы и добавить этот код под комментарием, который вы сделали:
.wpcf7 input[type="text"],
.wpcf7 input[type="email"],
.wpcf7 textarea
{
    border: 1px solid #000000;
}
В редакторе ваш CSS должен выглядеть так:
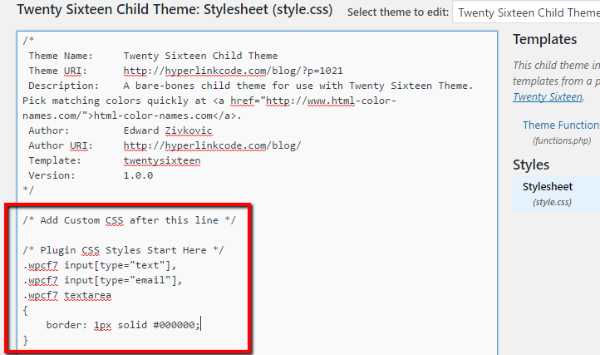
После сохранения таблицы стилей и обновления вашей формы обратной связи, вы должны увидеть это:
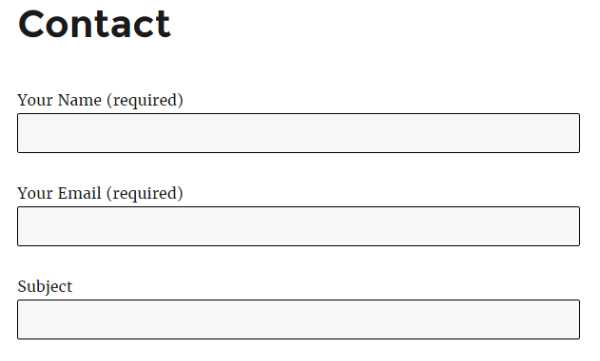
Теперь границы полей ввода выделены черной рамкой.
Если вы используете Divi, то ваш код будет таким же, только добавляется он в другом месте:
Конечно, это просто эксперимент, поскольку вам не нужен плагин формы обратной связи в Divi. Но этот метод сработает с любым плагином!
Итоги
Добавление пользовательских CSS стилей в WordPress является довольно простым процессом. Тяжелее всего узнать, какой CSS код нужно добавить или изменить. Вы не станете экспертом в CSS за одну ночь, но есть простой трюк.
Чтобы подсмотреть, какие стили вам нужно изменить для того или иного элемента на вашем сайте, откройте Developer Tools в Chrome (нажмите F12) и наведите мышкой на интересующий вас объект. Вы сразу же увидите, какие стили использует этот элемент.
Просто помните – всегда храните кастомный CSS в отдельной области, отделённой комментарием. Так вы всегда сможете его быстро найти.
А у вас есть советы по поводу кастомных CSS стилей? Расскажите нам в комментариях!
Насколько полезным был этот пост?
Нажмите на звезду, чтобы оценить этот пост!
Отправить рейтингСредний рейтинг: 4.5 / 5. Количество голосов: 2

Смотрите также:
hostenko.com
Simple Custom CSS — Плагин для WordPress
Легкий в использовании WordPress плагин, который позволяет добавить произвольные стили CSS, которые могут перезаписывать стили плагинов и тем. Этот плагин создан, чтобы удовлетворить нужды администраторов, которые бы хотели добавить свои собственные стили CSS на их WordPress сайт. Стили, добавленные через этот плагин, будут работать даже если тема изменена.
** New in Version 4.0.2 **
— Uses native WP CodeMirror on settings page (Does not load unnecessary scripts)
— Tested for WP version 5.1.1
— Tested for PHP version 7.2
Возможности
- Customizer Control (live preview)
- Полезная подсветка синтаксиса кода
- Code linting (error checking)
- Нет нужды в конфигурациях
- Simple interface built on native WordPress UI
- Практически не влияет на производительность сайта
- Нет сложных запросов к базе данных
- Подробная документация
- Allows Administrator access on WP Networks (Multisite)
The Simple Custom CSS в админ-панели
Контроль редактора Simple Custom CSS
Установите Simple Custom CSS как и любой другой плагин WP:
Download Simple Custom CSS from WordPress.org.
Распакуйте .zip файл.
Загрузите папку плагина (simple-custom-css/) в wp-content/plugins folder.
Go to Plugins Admin Panel and find the newly uploaded Plugin, «Simple Custom CSS» in the list.
Нажмите «Активировать» для активации плагина.
Начните использовать плагин перейдя во Внешний вид > Custom CSS в панели администратора; либо Внешний вид > Настроить, затем кликните на «Simple Custom CSS».
More help installing Plugins
- Будет ли этот плагин работать на WordPress.com сайтах?
Нам жаль, этот плагин доступен для использования только на self-hosted (WordPress.org) сайтах.
- Мои CSS стили не показываются
Есть несколько причин почему это может происходить:
Например, вы хотите:
a {
    color: #f00;
}
Когда вам нужно:
\#content a {
    color: #f00;
}
Специфичность, в которой вы нуждаетесь, зависит от правил CSS, которые вы пытаетесь переопределить.
- Ваш CSS невалиден.
Пожалуйста, проверьте свой CSS в W3C CSS сервис валидации.
This is one of the best Custom CSS Plugin I’ve ever used. I’ve been using it since 2016. This plugin works very well.
Warning to any one using this plugin: This plugin has been around for years at yet still loads CSS in the most inefficient way, serving the CSS using a dynamic non-cacheable request on every page. This will not only affect the first page visited but will delay the render of every subsequent page visited. My advice would be to remove this plugin and use the default WordPress CSS editor, under the appearance > customize tab. There’s simply no reason to use this plugin.
Simple, lightweight and perfect. It’s the first plugin I add to all my sites. Has a decent sized viewer, unlike the css option in customizer that comes with some themes. Zero problems with this plugin.
Clean and simple as a Custom CSS plugin is supposed to be. Tired of all the silly un-needed bells and whistles getting added to CSS plugins. If you could move it out of the Appearance sub nav group and into its own link in the dashboard nav so I can go right to it while editing, I’ll change this to 5 stars in a heartbeat!
The add-on works immediately after installation. That’s what I expected
Very good plugin! Thanks!
Посмотреть все 147 отзывов«Simple Custom CSS» — проект с открытым исходным кодом. В развитие плагина внесли свой вклад следующие участники:
Участники4.0.3
- Tested for compatibility with WP version 5.3
4.0.2
- Use WP’s CodeMirror on settings page
- Tested for compatibility with WP version 5.1.1
- Tested for compatibility with PHP version 7.2
4.0.1
- Исправлен баг со сломанными стилями редактора на старых версиях WP.
4.0
- Новый контроль редактора (все еще совместимо со старыми версиями WP)
- Добавлены подсветка и linting кода (проверка ошибок) для страницы настроек
- Обновлены хуки для замены дефисов нижним подчеркиванием
- Протестировано на соблюдение WPCS
- Протестировано на совместимость с версией WP 4.9.4
3.3
- Добавлена поддержка для https://
- Добавлена базовая поддержка датского языка. Спасибо @ThomasDK81!
- Протестировано на совместимость с WP версией 4.4.1
3.2
- Протестировано на совместимость на WP 4.1
- Улучшенная архитектура для уменьшения количества запросов (Спасибо, @dvankooten!)
3.0.1
- Протестировано на совместимость на WP 3.9.1
- Добавлена кнопка «Обновить стили CSS»
3.0
- Добавлена подсветка синтаксиса
- Удалена необходимость в чекбоксе «Разрешить кавычки»
- Удален текст атрибуции плагина
- Администраторам на мультисайтах разрешен доступ к плагину
- Небольшое изменение стиля. Спасибо @kucrut!
2.5
- Исправлены ошибки с установкой WP в субдерикториях. Спасибо @lopo!
- Протестировано на совместимость на WP 3.8.1
2.0
- Добавлена опция, позволяющая двойные кавычки в CSS
- Протестировано на совместимость на WP 3.8
1.2.1
- Протестировано на совместимость на WP 3.7.1
- Code update to conform fully with WP coding standards
1.2
- Дает Администраторам (не Супер-Администраторам) доступ к плагину
- Исправление ошибки Credit
- Исправления небольших багов
1.1.1
- Разрешен прямой дочерний селектор «>».
1.1
- Добавлен ненужный скрытый input
- Добавлены хуки
- Добавлена очистка при удалении
- Добавлена опция атрибуции автора
- Добавлен более элегантный метод добавления CSS на страницу:
Instead of using print_scripts() to insert the CSS directly into the HEAD, CSS styles are generated within simple-custom-css.php, then added via wp_enqueue_scripts, so now it will appear in the HEAD as:
<link rel="stylesheet" href="http://yoursite.com/?sccss=1" />
… даже несмотря на то, что файл css не создается. Для получения более подробной информации см. комментарии в файле плагина.
1.0
ru.wordpress.org
Simple CSS — Плагин для WordPress
Need to add some custom CSS to your site? Simple CSS gives you an awesome admin editor and a live preview editor in the Customizer so you can easily add your CSS.
Want your CSS to only apply on a specific page or post? Simple CSS adds a metabox which allows you to do just that.
Check out GeneratePress, our awesome WordPress theme! (https://wordpress.org/themes/generatepress)
Features include:
- Full featured admin CSS editor
- Dark and light editor themes
- CSS editor in the Customizer so you can live preview your changes
- Metabox for page/post specific CSS
- The dark theme of the CSS editor.
- The light theme of the CSS editor.
- The CSS editor in the Customizer.
- The CSS editor metabox.
There’s two ways to install Simple CSS.
- Go to «Plugins > Add New» in your Dashboard and search for: Simple CSS
- Download the .zip from WordPress.org, and upload the folder to the
/wp-content/plugins/directory via FTP.
In most cases, #1 will work fine and is way easier.
- How do I add CSS using your plugin?
- Make sure Simple CSS is activated.
- Navigate to «Appearance > Simple CSS» and add your CSS to the editor.
- How do I add CSS using the Customizer?
- Make sure Simple CSS is activated.
- Navigation to «Appearance > Customize» and open the «Simple CSS» section.
- How do I change the editor color?
- In «Appearance > Simple CSS», change the «Dark» option below the «Save CSS» button to «Light».
- How do I add CSS that applies only to one page?
- Navigate to your page or post in the Dashboard and look for the «Simple CSS» metabox.
«Simple CSS» — проект с открытым исходным кодом. В развитие плагина внесли свой вклад следующие участники:
Участники1.1
- Fix meta box saving issue
1.0
- Show metabox only on public post types
- Add live preview to Customizer
- Code cleanup
- Better sanitizing/validation
0.4
- Use browser search instead of CodeMirror dialog search
- Don’t show GeneratePress metabox if it’s already activated
- Make CSS box full height
0.3
- Add CSS metabox to add CSS on specific pages and posts
- Adjust styling of dark theme
- Add tips to Simple CSS screen
0.2
- Remove extra whitespace from CSS output
- Remove spellcheck from Customizer input
- Allow > characters in the CSS
- Add find (ctrl + f) functionality
0.1
ru.wordpress.org
WP Critical CSS – WordPress plugin
This plugin will automatically have the CriticalCSS.com web service get the needed above the fold CSS for every page on your site to help improve your user experience and site speed. This is commonly required by google pagespeed as one of the last steps to do.
This plugin alone will not improve site performance. You need a minify and/or caching plugin as well.
This plugin does not handle any minification or re-ordering of assets. I recommend using WP Rocket with my WP Rocket Footer JS, WP Rocket ASYNC CSS, and the plugin Preloader
If you are looking for a professional team to get your WordPress site to run faster, check us out for our speed optimization services at Rank Grow Digital
This section describes how to install the plugin and get it working.
- Upload the plugin files to the
/wp-content/plugins/criticalcssdirectory, or install the plugin through the WordPress plugins screen directly. - Activate the plugin through the ‘Plugins’ screen in WordPress
- Go to Settings -> Critical CSS, and add your API key from CriticalCSS.com.
- Where do I get an API key from?
Please sign up at CriticalCSS.com then go to CriticalCSS.com API Keys. Be sure to read the additional pricing information!
At the time of writing (1 Jan 2017) the price for using CriticalCSS.com is:
£2/month for membership + £5/domain/month. This means the total cost will be £7/month if you use this plugin for one site.
- How do I report an issue?
You may go to https://www.github.com/pcfreak30/wp-criticalcss/issues and make a new issue. For any support, see the support forums.
- Will this work for inside paywalls or membershp sites?
Currently no. Since CriticalCSS.com can not access protected pages currently, the page must be publicaly visible to work. Means to allow this to work may come in the future.
- What will happen if I update content on the site or change my theme?
The plugins css cache will automatically purge for that post or term and get queued for processing again on the next user request of it.
- What will happen if I upgrade a plugin or theme?
The whole cache will be purged regardless of the purge setting
- Does this support any caching plugins?
Yes currently WP-Rocket is supported. Others can be added as integrations on request.
Generally any host. Some hosts like WPEngine has special support to purge the server cache.
- What is the
/nocache/in the URL’s in the queue?
This is used as a special version of the web page that forcibly disables supported caching and minify plugins to ensure that critical css is created without complications. SEO wise these URL’s are safe as they have no references anywhere and google will not be aware to crawl them.
Сайт перестал работать. Пришлось откатывать. Специально зарегистрировался, чтобы влепить кол.
It’s not for the faint of heart, but if you want your Google page speed to hit 100 and you don’t want any FOUC, you need this plugin. Needs a little work to support our Custom Post Types, but it still gets a 5 because it’s awesome. Donation forthcoming as soon as my boss gets on it..
Read all 3 reviews“WP Critical CSS” is open source software. The following people have contributed to this plugin.
Contributors0.7.7
- Bug: Fix edge case with custom post types rewrite rules by putting them before the generic rules
0.7.6
- Bug: Don’t check for manual css to see if we need to add to queue since we can just disable the api by removing the key
- Bug: Fix forceInclude CSS selectors functionality. It was not sending the right field name to the API.
- Bug: Dont try and remove duplicate rewrite rules due to possible edge cases
- Compatibility: WP Rocket 3.4 got rid of get_rocket_purge_cron_interval, add compatibility
0.7.5
- Bug: Misc fixes to remove warnings with $_POST vars
- Bug: Fix what is purged in web fetch mode for the page check flag
- Bug: Remove use of compat function
- Bug: Fix slashing in saving critical css data
- Feature: Add WebP compatibility to force webp detection off no nocache requests
- Enhancement: Refactor queue logic to only process 1 item per run and don’t die after
- Enhancement: Refactor kinsta integration to use their mu-plugin for purging
- Enhancement: Refactor rewrite url logic for nocache urls based on WP Core rewrite class
- Enhancement: Enable the queue processes to run until the queue is empty with filterable delays if running in PHP CLI mode (shell)
- Enhancement: Remove the paging in the queue UI tables for simplicity
- Enhancement: Add compatibility with Kinsta caching to bust it with a query string for nocache urls
- Compatibility: Add compatibility with SEO/redirect plugins
0.7.4
- Compatibility: Add compatibility support for Elementor to prevent critical css from showing up on editor preview
0.7.3
- Bug: Prevent override of DONOTCACHEPAGE with WP Rocket
- Enhancement: Ensure that nocache pages are purged on wpengine to prevent caching
- Compatibility: Add compatibility support for Kinsta hosting
0.7.2
- Enhancement: Update framework
0.7.1
- Bug: Fix small random bugs
- Bug: Don’t check queue in content mode if we have manual or fallback CSS
- Bug: If global fallback cache is empty, ensure $fallback is false
- Bug: Ensure item data is stored correctly for meta in multisite
- Bug: Handle JOB_ONGOING status in processing
- Bug: If prioritize_manual_css is not on then set manual to false to ensure its queued
- Bug: Don’t hook wp_criticalcss_purge_cache during cron
- Bug: If remote CSS file could not be fetched, skip it instead of silently failing
- Enhancement: Add upgrade logic to clean up tables
- Enhancement: Only set CSS content hashes if no template is set in background processing
- Enhancement: Don’t show force_web_check option in template mode
- Enhancement: Only show post type, archive and taxonomy css options if manual css is on
- Enhancement: Don’t show template cache if manual css is on
- Enhancement: Don’t purge cache if manual css is on and there is no API key
- Enhancement: Only show queue and log tabs if an api key is entered
- Enhancement: Don’t purge cache if API key is empty
- Enhancement: Allow API key to be emptyued
- Enhancement: Support query vars in get_current_page_type
- Feature: Allow manual css for post types, post type archives, and taxonomies
- Feature: Add template log to track what pages have been enqueued for a template to improve purging
- Feature: Add checking for post type, post type archive, and taxonomy CSS
- Compatibility: Force wp-rocket’s critical css off
- Compatibility: Add integration with a3 lazy load to disable lazy load on nocache pages
0.7.0.1
- Bug: Fix usage of restore_current_blog being undefined
0.7.0
Big Warning
This is a MAJOR release and over 50% of the code is rewritten. While it has been extensively tested, there may still be bugs! Please test in a development site before deploying! Due to the amount of work, only a summary of this version will be detailed below.
- Major rewrite using new composer based framework.
- Feature: Added queue table for web check queue.
- Feature: Added log table which gets purged via custom cron event if there is no cache integration.
- Feature: Added ability to force styles to be included in critical css with simple names or regex.
- Feature: Added ability to give a manual CSS input for any term or post
- Feature: Added ability to have a parent hierarchical term or hierarchical custom post type override its children and force them to use its CSS. The very top parent with the override will be used. This is exposed with the manual input on editing a term or post.
- Feature: Added ability to force manual css to always be used in-place of generated css.
- Feature: Added a setting for a global CSS fallback. This is manual input only.
- Bugs: Too many to review that are fixed
0.6.4
- Bug: SECOND_IN_SECONDS is defined in wp-rockets compatibility code only, so must be removed
0.6.3
- Bug: Ensure object_id is an integer in get_permalink
- Bug: Disable rocket_clean_wpengine and rocket_clean_supercacher functions in after_rocket_clean_domain action when disabling integrations
- Enhancement: Don’t use web check transient in template mode
0.6.2
- Bug: Don’t clear web check flags for posts or terms on edit in template mode
0.6.1
0.5.1
- Bug: Use get_expire_period not get_rocket_purge_cron_interval
0.5.0
- Bug: Replace purge lock with disable_external_integration method due to the order that the actions run
- Bug: Disable external integration when purging cache from web check queue
- Enhancement: Improve redirect_canonical logic
- Enhancement: Rebuild cache system without using SQL
- Cleanup: Clean up code and fix typo with cache
0.4.5
- Change: Generalize fix_woocommerce_rewrite to fix_rewrites
- Bug: Add nocache URL rewrite fix for page archives
- Tweak: Don’t append $query_string as it is generally unnecessary
0.4.4
- Bug: Ensure all custom taxonomies that have rewrite enabled have the nocache url enabled
- Bug: Fix woocommerce taxonomies by forcing all nocache rewrite rules for woocommerce taxonomies to the top of the rewrite rule list
0.4.3
- Enhancement: Added hack for WPEngine websites to prevent duplicate item entries
0.4.2
- Enhancement: Convert relative URL’s to absolute when doing a web check
0.4.1
- Bug: Add a purge_lock property with getter/setter to flag when cache is being purged due to a item completing the API queue to prevent a process infinate cycle
0.4.0
- Bug: Fix version comparison logic for upgrade routines and allow previous upgrade code to run on 0.4.0 upgrade due to the bug
- Enhancement: Major refactor to use dedicated mysql storage tables for queue instead of wp_options to simplify data management and ensure no duplicates can exist
- Enhancement: If $url in WP_CriticalCSS::get_permalink is a WP_Error, return false
- Enhancement: Skip item in web check queue if item exists in API queue or the permalink is false
- Cleanup: Purge all queue items from options table and web check transients on 0.4.0 upgrade
0.3.6
- Bug: Only set DONOTCACHEPAGE if not set
0.3.5
- Enhancement: If nocache is on, add robots meta for SEO to prevent duplicate content
0.3.4
- Bug: Add slashes with wp_slash to protect post meta with slashes
0.3.3
- Bug: Ensure the version setting actually updates on upgrade
0.3.2
- Enhancement: Prevent duplicate web request queue items by querying the serialized data from the options table
0.3.1
- Bug: Fix purge bulk action
- Cleanup: Merge settings classes together
0.3.0
- Bug: Store status information when a generate API request is made
- Enhancement: Rework elements of settings UI
- Enhancement: Add bulk purge option in queue table
- Enhancement: Queue system and core system refactor that checks for changes by hashing html and css output via web request
0.2.5
- Bug: after_rocket_clean_domain hook needs to be in disable_autopurge check
0.2.4.1
- Bug: Messed up 0.2.4 version number
0.2.4
- Change: Do not automatically auto-purge by default
- Bug: Use parse_url and http_build_url to safely append nocache in the permalink
- Bug: Allow purge through wp-rocket to work if its not through cron
- Bug: Fix timestamp logic
- Enhancement: Do not process critical css on 404 pages
0.2.3
- Bug: Rename more places to wp_criticalcss
0.2.2
- Change: Renamed options page
- Bug: Switch to using OPTIONNAME constant
0.2.1
- Bug: Missed places to use new class name
0.2.0
- Change: Rename everything to WP CriticalCSS due to legalities. This means that it will not be fully compatible with 0.1.x as all classes and options are renamed.
0.1.3
- Bug/Enhancement: Use a simpler means to enable nocache on the homepage thats less error prone
- Cleanup: reorder_rewrite_rules method not needed
0.1.2
- Bug: Revert bug fix for purging in 0.1.1 and just purge before setting cache
0.1.1
- Bug: Always delete pending transient if there is no fatal error
- Bug: Toggle purge plugin integration to prevent generated css from getting purged
- Enhancement: If WP_Error just return item so it will get re-attempted
- Enhancement: Add method to disable purge plugin integration
0.1.0
wordpress.org
WP Critical CSS — Плагин для WordPress
This plugin will automatically have the CriticalCSS.com web service get the needed above the fold CSS for every page on your site to help improve your user experience and site speed. This is commonly required by google pagespeed as one of the last steps to do.
This plugin alone will not improve site performance. You need a minify and/or caching plugin as well.
This plugin does not handle any minification or re-ordering of assets. I recommend using WP Rocket with my WP Rocket Footer JS, WP Rocket ASYNC CSS, and the plugin Preloader
If you are looking for a professional team to get your WordPress site to run faster, check us out for our speed optimization services at Rank Grow Digital
This section describes how to install the plugin and get it working.
- Upload the plugin files to the
/wp-content/plugins/criticalcssdirectory, or install the plugin through the WordPress plugins screen directly. - Activate the plugin through the ‘Plugins’ screen in WordPress
- Go to Settings -> Critical CSS, and add your API key from CriticalCSS.com.
- Where do I get an API key from?
Please sign up at CriticalCSS.com then go to CriticalCSS.com API Keys. Be sure to read the additional pricing information!
At the time of writing (1 Jan 2017) the price for using CriticalCSS.com is:
£2/month for membership + £5/domain/month. This means the total cost will be £7/month if you use this plugin for one site.
- How do I report an issue?
You may go to https://www.github.com/pcfreak30/wp-criticalcss/issues and make a new issue. For any support, see the support forums.
- Will this work for inside paywalls or membershp sites?
Currently no. Since CriticalCSS.com can not access protected pages currently, the page must be publicaly visible to work. Means to allow this to work may come in the future.
- What will happen if I update content on the site or change my theme?
The plugins css cache will automatically purge for that post or term and get queued for processing again on the next user request of it.
- What will happen if I upgrade a plugin or theme?
The whole cache will be purged regardless of the purge setting
- Does this support any caching plugins?
Yes currently WP-Rocket is supported. Others can be added as integrations on request.
Generally any host. Some hosts like WPEngine has special support to purge the server cache.
- What is the
/nocache/in the URL’s in the queue?
This is used as a special version of the web page that forcibly disables supported caching and minify plugins to ensure that critical css is created without complications. SEO wise these URL’s are safe as they have no references anywhere and google will not be aware to crawl them.
Сайт перестал работать. Пришлось откатывать. Специально зарегистрировался, чтобы влепить кол.
It’s not for the faint of heart, but if you want your Google page speed to hit 100 and you don’t want any FOUC, you need this plugin. Needs a little work to support our Custom Post Types, but it still gets a 5 because it’s awesome. Donation forthcoming as soon as my boss gets on it..
Посмотреть все 3 отзыва«WP Critical CSS» — проект с открытым исходным кодом. В развитие плагина внесли свой вклад следующие участники:
Участники0.7.7
- Bug: Fix edge case with custom post types rewrite rules by putting them before the generic rules
0.7.6
- Bug: Don’t check for manual css to see if we need to add to queue since we can just disable the api by removing the key
- Bug: Fix forceInclude CSS selectors functionality. It was not sending the right field name to the API.
- Bug: Dont try and remove duplicate rewrite rules due to possible edge cases
- Compatibility: WP Rocket 3.4 got rid of get_rocket_purge_cron_interval, add compatibility
0.7.5
- Bug: Misc fixes to remove warnings with $_POST vars
- Bug: Fix what is purged in web fetch mode for the page check flag
- Bug: Remove use of compat function
- Bug: Fix slashing in saving critical css data
- Feature: Add WebP compatibility to force webp detection off no nocache requests
- Enhancement: Refactor queue logic to only process 1 item per run and don’t die after
- Enhancement: Refactor kinsta integration to use their mu-plugin for purging
- Enhancement: Refactor rewrite url logic for nocache urls based on WP Core rewrite class
- Enhancement: Enable the queue processes to run until the queue is empty with filterable delays if running in PHP CLI mode (shell)
- Enhancement: Remove the paging in the queue UI tables for simplicity
- Enhancement: Add compatibility with Kinsta caching to bust it with a query string for nocache urls
- Compatibility: Add compatibility with SEO/redirect plugins
0.7.4
- Compatibility: Add compatibility support for Elementor to prevent critical css from showing up on editor preview
0.7.3
- Bug: Prevent override of DONOTCACHEPAGE with WP Rocket
- Enhancement: Ensure that nocache pages are purged on wpengine to prevent caching
- Compatibility: Add compatibility support for Kinsta hosting
0.7.2
- Enhancement: Update framework
0.7.1
- Bug: Fix small random bugs
- Bug: Don’t check queue in content mode if we have manual or fallback CSS
- Bug: If global fallback cache is empty, ensure $fallback is false
- Bug: Ensure item data is stored correctly for meta in multisite
- Bug: Handle JOB_ONGOING status in processing
- Bug: If prioritize_manual_css is not on then set manual to false to ensure its queued
- Bug: Don’t hook wp_criticalcss_purge_cache during cron
- Bug: If remote CSS file could not be fetched, skip it instead of silently failing
- Enhancement: Add upgrade logic to clean up tables
- Enhancement: Only set CSS content hashes if no template is set in background processing
- Enhancement: Don’t show force_web_check option in template mode
- Enhancement: Only show post type, archive and taxonomy css options if manual css is on
- Enhancement: Don’t show template cache if manual css is on
- Enhancement: Don’t purge cache if manual css is on and there is no API key
- Enhancement: Only show queue and log tabs if an api key is entered
- Enhancement: Don’t purge cache if API key is empty
- Enhancement: Allow API key to be emptyued
- Enhancement: Support query vars in get_current_page_type
- Feature: Allow manual css for post types, post type archives, and taxonomies
- Feature: Add template log to track what pages have been enqueued for a template to improve purging
- Feature: Add checking for post type, post type archive, and taxonomy CSS
- Compatibility: Force wp-rocket’s critical css off
- Compatibility: Add integration with a3 lazy load to disable lazy load on nocache pages
0.7.0.1
- Bug: Fix usage of restore_current_blog being undefined
0.7.0
Big Warning
This is a MAJOR release and over 50% of the code is rewritten. While it has been extensively tested, there may still be bugs! Please test in a development site before deploying! Due to the amount of work, only a summary of this version will be detailed below.
- Major rewrite using new composer based framework.
- Feature: Added queue table for web check queue.
- Feature: Added log table which gets purged via custom cron event if there is no cache integration.
- Feature: Added ability to force styles to be included in critical css with simple names or regex.
- Feature: Added ability to give a manual CSS input for any term or post
- Feature: Added ability to have a parent hierarchical term or hierarchical custom post type override its children and force them to use its CSS. The very top parent with the override will be used. This is exposed with the manual input on editing a term or post.
- Feature: Added ability to force manual css to always be used in-place of generated css.
- Feature: Added a setting for a global CSS fallback. This is manual input only.
- Bugs: Too many to review that are fixed
0.6.4
- Bug: SECOND_IN_SECONDS is defined in wp-rockets compatibility code only, so must be removed
0.6.3
- Bug: Ensure object_id is an integer in get_permalink
- Bug: Disable rocket_clean_wpengine and rocket_clean_supercacher functions in after_rocket_clean_domain action when disabling integrations
- Enhancement: Don’t use web check transient in template mode
0.6.2
- Bug: Don’t clear web check flags for posts or terms on edit in template mode
0.6.1
0.5.1
- Bug: Use get_expire_period not get_rocket_purge_cron_interval
0.5.0
- Bug: Replace purge lock with disable_external_integration method due to the order that the actions run
- Bug: Disable external integration when purging cache from web check queue
- Enhancement: Improve redirect_canonical logic
- Enhancement: Rebuild cache system without using SQL
- Cleanup: Clean up code and fix typo with cache
0.4.5
- Change: Generalize fix_woocommerce_rewrite to fix_rewrites
- Bug: Add nocache URL rewrite fix for page archives
- Tweak: Don’t append $query_string as it is generally unnecessary
0.4.4
- Bug: Ensure all custom taxonomies that have rewrite enabled have the nocache url enabled
- Bug: Fix woocommerce taxonomies by forcing all nocache rewrite rules for woocommerce taxonomies to the top of the rewrite rule list
0.4.3
- Enhancement: Added hack for WPEngine websites to prevent duplicate item entries
0.4.2
- Enhancement: Convert relative URL’s to absolute when doing a web check
0.4.1
- Bug: Add a purge_lock property with getter/setter to flag when cache is being purged due to a item completing the API queue to prevent a process infinate cycle
0.4.0
- Bug: Fix version comparison logic for upgrade routines and allow previous upgrade code to run on 0.4.0 upgrade due to the bug
- Enhancement: Major refactor to use dedicated mysql storage tables for queue instead of wp_options to simplify data management and ensure no duplicates can exist
- Enhancement: If $url in WP_CriticalCSS::get_permalink is a WP_Error, return false
- Enhancement: Skip item in web check queue if item exists in API queue or the permalink is false
- Cleanup: Purge all queue items from options table and web check transients on 0.4.0 upgrade
0.3.6
- Bug: Only set DONOTCACHEPAGE if not set
0.3.5
- Enhancement: If nocache is on, add robots meta for SEO to prevent duplicate content
0.3.4
- Bug: Add slashes with wp_slash to protect post meta with slashes
0.3.3
- Bug: Ensure the version setting actually updates on upgrade
0.3.2
- Enhancement: Prevent duplicate web request queue items by querying the serialized data from the options table
0.3.1
- Bug: Fix purge bulk action
- Cleanup: Merge settings classes together
0.3.0
- Bug: Store status information when a generate API request is made
- Enhancement: Rework elements of settings UI
- Enhancement: Add bulk purge option in queue table
- Enhancement: Queue system and core system refactor that checks for changes by hashing html and css output via web request
0.2.5
- Bug: after_rocket_clean_domain hook needs to be in disable_autopurge check
0.2.4.1
- Bug: Messed up 0.2.4 version number
0.2.4
- Change: Do not automatically auto-purge by default
- Bug: Use parse_url and http_build_url to safely append nocache in the permalink
- Bug: Allow purge through wp-rocket to work if its not through cron
- Bug: Fix timestamp logic
- Enhancement: Do not process critical css on 404 pages
0.2.3
- Bug: Rename more places to wp_criticalcss
0.2.2
- Change: Renamed options page
- Bug: Switch to using OPTIONNAME constant
0.2.1
- Bug: Missed places to use new class name
0.2.0
- Change: Rename everything to WP CriticalCSS due to legalities. This means that it will not be fully compatible with 0.1.x as all classes and options are renamed.
0.1.3
- Bug/Enhancement: Use a simpler means to enable nocache on the homepage thats less error prone
- Cleanup: reorder_rewrite_rules method not needed
0.1.2
- Bug: Revert bug fix for purging in 0.1.1 and just purge before setting cache
0.1.1
- Bug: Always delete pending transient if there is no fatal error
- Bug: Toggle purge plugin integration to prevent generated css from getting purged
- Enhancement: If WP_Error just return item so it will get re-attempted
- Enhancement: Add method to disable purge plugin integration
0.1.0
ru.wordpress.org
