Timeline
TimelineJS is an open-source tool that enables anyone to build visually rich, interactive timelines. Beginners can create a timeline using nothing more than a Google spreadsheet, like the one we used for the Timeline above. Experts can use their JSON skills to create custom installations, while keeping TimelineJS’s core functionality.
Knight Lab Watch this brief video for an overview of how to make a timeline.Tips & tricks
- Keep it short. We recommend not having more than 20 slides for a reader to click through.
- Pick stories that have a strong chronological narrative. It does not work well for stories that need to jump around in the timeline.
- Write each event as a part of a larger narrative.


Media sources
TimelineJS can pull in media from a variety of sources. Twitter, Flickr, YouTube, Vimeo, Vine, Dailymotion, Google Maps, Wikipedia, SoundCloud, Document Cloud and more!
Examples
Mandela: A Life of Purpose
Chronology of the French Presidential Race
Historic Fall at University of Missouri
North Korea’s Nuclear Ambitions
Bulger on Trial
The Decline of IRS Nonprofit Regulation
Aurora, Colorado Movie Theater Shooting
The Collapse of Microsoft and Nokia’s Mobile Business
How ISIS Spread to 10 Countries
Reported Sexual Assault Cases by Texas Educators
A History of Wine Around the World
The Mystery of Malaysia Airlines Flight 370
A Brief History of the Banana Business
Make a Timeline
 Make your own in four easy steps.
 Having trouble? Watch our video, or see the help section below.
Create your spreadsheet
Build a new Google Spreadsheet using our template. You’ll need to copy the template to your own Google Drive account by clicking the «Make a Copy» button.
Drop dates, text and links to media into the appropriate columns. For more about working with our template, see Making a timeline from a Google Spreadsheet
Get the Spreadsheet Template
Don’t change the column headers, don’t remove any columns, and don’t leave any blank rows in your spreadsheet.
Publish to the web
Under the File menu, Share submenu, select “Publish to the Web.”
Don’t set your Timeline Google Sheet to «anyone with the link can edit.

In the next window, click the green «Publish» button. When asked, «Are you sure…?» click OK. Ignore the URL that appears in the center of the window. Just close the window using the X in the top right corner.
After you close the window, copy the URL in your browser’s address bar. You’ll use this in the next step.
If you get an error message referencing an «Invalid Google URL,» please review the above instructions. You must use the Google Sheets URL from your browser’s address bar, not the one from the «publish to the web» popup.
Generate your timeline
Copy/paste spreadsheet URL into the box below to generate your timeline.
 (Make sure you’ve published the spreadsheet.)
Optional settings (show) (hide)
Set language, fonts, starting slide and more.
Language
EnglishEnglish (24-hour time)العربيةAfrikaansBahasa IndonesiaBahasa MelayuБеларуская мовабългарски езикCatalàČeštinaDanskहिन्दीDeutschEesti keelελληνικάEspañolEsperantoEuskaraFøroysktFrançaisFryskGaeilgeGalego한국어HrvatskiՀայերէնÍslenskaItalianoעבריתქართულიLatviešu valodaLëtzebuergeschLietuvių kalbaLimba românăMagyar မြန်မာNederlandsनेपाली日本語Norsk (bokmål)Norsk (nynorsk)ภาษาไทยPolskiPortuguêsPortuguês (Brasil)RumantschРусский языкසිංහලSlovenščinaSlovenčinaSrpskiсрпскиSuomiSvenskaTaiwaneseTagalogதமிழ்తెలుగుTürkçeУкраїнськаاُردُوTiếng Việtفارسی中文Map Type
Currently all Google’s base maps are supported.
 When creating a Google map, style it the way you would like it to appear, and then paste the resulting link into your Google Spreadsheet.
Default start slide
Slide
You can tell TimelineJS to start at a specific slide number.
Initial zoom level
Zoom Level
The zoom level at which the timeline portion of TimelineJS will display on load. Specify a value from 0-10 (default is 2). Smaller numbers show a greater span of time.
Start at the end
Begins the timeline on the last slide.Show nav on top
Switches the vertical order of the timeline navigation and the media.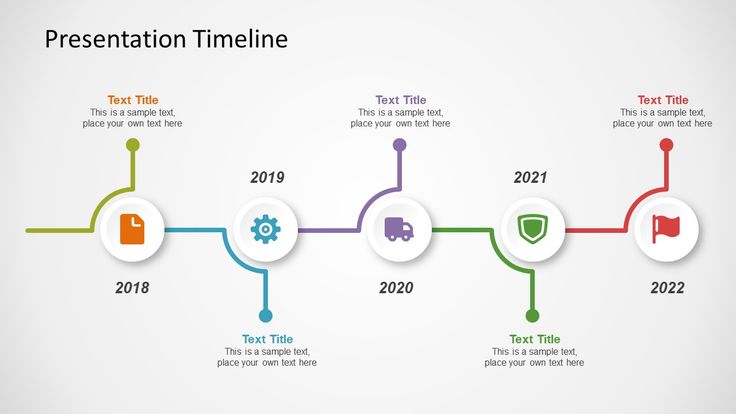
Debug
In debug mode, the JavaScript console will display logging messages.Use hash bookmarks
Assigns a hash bookmark to each slide’s URL, allowing deep linking to slides. (For directly linked Timelines only — does not work for iframe embeds)Use this to link directly to your timeline.
If you’re embedding on Medium.com or other oembed-aware services, just paste this link on a line by itself where you want your timeline to appear.
https://cdn.knightlab.com/libs/timeline3/latest/embed/index.html?source=1xuY4upIooEeszZ_lCmeNx24eSFWe0rHe9Zdqh3xqVNk&font=Default&lang=en&initial_zoom=2&height=100%
Embed
Preview Open Preview in a new window
- Use our spreadsheet template
- Supported Media Types
- JSON data format reference
- Changing the Appearance of your Timeline
- Timeline Configuration Options
- Using TimelineJS in Javascript
How do I edit my timeline?
Once you’ve created a timeline, you can make changes by going back to your Google spreadsheet.
 Changes you make to the spreadsheet are automatically available to your Timeline—you don’t need to repeat the ‘publish to the web’ step (step #2). If you want to make changes to the optional settings, you will need to update your embed code, but if you are only changing content in the spreadsheet, then there’s nothing else to do.
What web browsers does TimelineJS work with?
Our primary development and testing browser is Google Chrome. We adhere closely to web standards, so we believe that TimelineJS should work effectively in all modern web browsers. TimelineJS is known to not work with Internet Explorer versions before IE10.
Some of my slides aren’t showing up. Where are they?
If the slides which aren’t appearing are at the end of your timeline, look for a blank spreadsheet row right after the last slide which is appearing.
 When TimelineJS asks Google for your data, Google only sends up to the first blank row, so TimelineJS is actually showing everything that it can. Don’t forget to look for hidden spreadsheet rows or rows with a very small height.
What are my options for changing how my Timeline looks?
First, make sure you know everything you can do in the spreadsheet configuration, like background colors and images. Also, check out the optional settings part of ‘step 3’ of the authoring tool. You can change the fonts, the position of the timeline navigation, and the initial zoom level. If you still want to do more, there are some configuration options available. Most of those are for fine tuning, but some of them may be helpful.
There aren’t enough options.
 I want more control over the [font size/color/etc]. Can I change things using CSS?
Because there are so many details to the styling, this is not exactly simple, but, if you have some technical capacity, you can override TimelineJS’s CSS rules and have complete control over the look of the timeline. For details, see Overriding Timeline’s Styles.
How can I categorize or group my events?
Every event in a timeline can have a group property. Events with the same group are shown in the same row or adjacent rows, and the common value of their group property is used as a label at the left edge of the timeline. Groups can be set using the ‘group’ column in the Google Spreadsheet or the ‘group’ property of a JSON slide object. TimelineJS does not support any other special styling for events in the same group.

The first slide in my timeline isn’t the first chronologically. Why did this happen?
When using the Google Spreadsheet to configure your timeline, if you put the word
titlein thetypecolumn, that slide will be put at the front, regardless of the values in the date columns. See the Google Spreadsheet documentation for more information.Can I make media images clickable?
No. Many of TimelineJS’s media types are interactive, and so would not be able to handle a link, and other of TimelineJS’s media types have terms of service which require a link back to the source of the media. As an alternative, consider using HTML to add links in the caption, credit, or text for the slide.
How can I format text (add line breaks, bold, italics)?
TimelineJS’s text fields (headline, text, caption, and credit) all accept HTML markup. A full tutorial on HTML is outside the scope of this FAQ, but here are a few basics:
- Wrap paragraphs in
<p></p>tags to create line breaks. - Wrap text in
<b></b>tags for bold text and<i></i>for italics
- Wrap paragraphs in
How do I enter BCE dates?
To enter dates before the common era, just use a negative value for the year. Of course, you can also enter month and date if you need them.
How do I create very ancient dates?
Generally, you don’t have to think about it — just enter the dates you want.
 Timeline can handle dates literally to the beginning of time. For dates more than about 250,000 years ago, only the year is usable. Support for those older dates is still relatively new, so if anything seems off, visit our tech support site.
Who can access the data in my Google spreadsheet?
You must make the data public to the web to use TimelineJS with a Google Spreadsheet as the data source. Normally, the data is still only visible to people who know the link, so if you publish a timeline privately, outsiders are unlikely to see the data. However, it is still public, so you must decide if that is acceptable.
Privacy is very important to me. How should I use TimelineJS?
If you want complete control over who can see the information in your timeline, you cannot use Google Spreadsheets, and you cannot use our standard
iframeembed code. Instead, you must use JSON format for the data and instantiate the timeline directly using javascript. You can then use standard web server security measures to control who has access to your timeline and the data used to create it.
Will my spreadsheet get picked up by search engines?
Under normal circumstances, Google tells search engines not to index spreadsheets which are published to the web. Of course, if the page is public on the web, it is possible that a search engine will disregard those instructions.
Can I use TimelineJS with WordPress?
It depends. TimelineJS does not work with WordPress.com sites. We are researching ways to address this.
If you are able to install plugins to your WordPress installation, we have a WordPress plugin for Timeline. It supports embedding Timelines with WordPress «shortcode», and as of version 3.3.14.0, it also has experimental «oembed» support. That means that you can take a direct URL to a timeline (like you get with the «get link to preview» button) and put it in a post on a line by itself, and it should be embedded. (Make sure you’ve updated the plugin before you try it.)
Is TimelineJS free for commercial use?
TimelineJS is released under the Mozilla Public License (MPL), version 2.0. That means that TimelineJS is free to «use, reproduce, make available, modify, display, perform, distribute» or otherwise employ. You don’t need our permission to publish stories with TimelineJS and you don’t need to pay us any fees or arrange any further license beyond the MPL. To read more about what you can do with TimelineJS, read our license page.
Preview Embed
Help
Need help? First, please be sure to look at our list of frequently asked questions below. If you’re brand new to Timeline JS, you may also want to watch our introductory video.
If you don’t find an answer there, try our support forums or use our tech support web form. Please be clear with your question, include a link to your spreadsheet, and if appropriate, a link to a page which shows the issue with which you need help. We can only answer support questions in English. We try to be prompt, but please understand that we do not have a dedicated tech support staff.
Find a bug? If you are confident you have found a bug, please report it as a GitHub issue. Be sure to include detailed instructions on how to reproduce the bug. If you’re not sure, please start with the tech support system.
Technical documentation
Go further with Timeline:
Frequently asked questions
Storytelling Tools
We build easy-to-use tools that can help you tell better stories.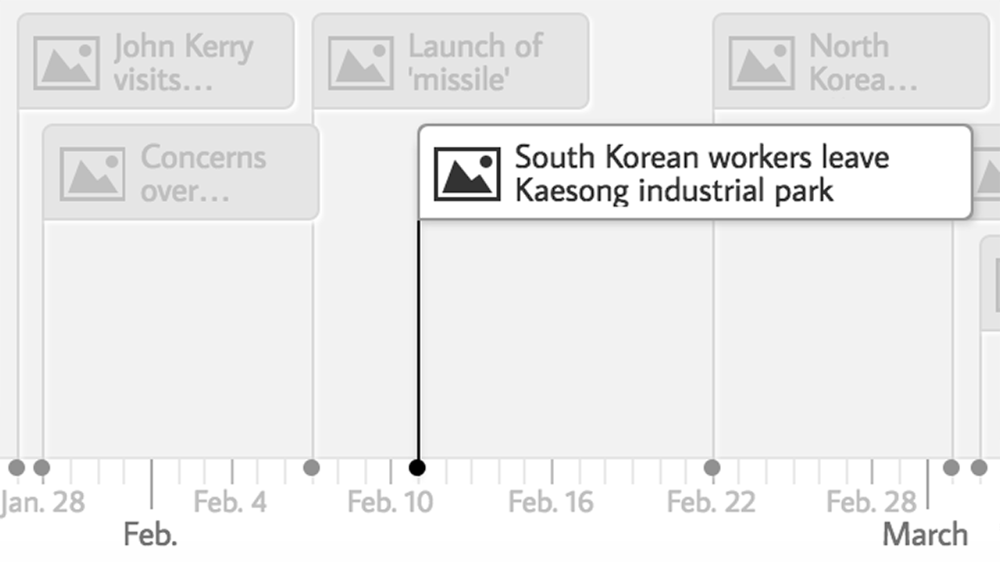
StoryMap JS
Maps that tell stories.
Juxtapose JS
Easy-to-make frame comparisons.
Soundcite JS
Seamless inline audio.
View MoreКак создать таймлайн. Timeline JS – sdelano.media
Сервис Timeline JS бесплатен, прост и универсален и позволяет встраивать полученный результат в страницу любого веб-сайта. Сервис «создает» таймлайн на основе таблицы Google. Если у вас нет там аккаунта, зарегистрируйтесь.
Проведите подготовительную работу. Соберите в текстовом файле события, которые внесете в таймлайн. Обозначьте у каждого события дату, добавьте к нему ссылку на фото, видео или код, например, на карту или инфографику.
Открывайте Timeline JS. Регистрироваться на сервисе не нужно. Кликните на зеленую кнопку в центре экрана «Make a Timeline».
Затем кликните на синюю кнопку «Get the Spreadsheet Template».
Создайте новую таблицу Google, используя шаблон сервиса. Скопируйте его в свою учетную запись Google Диска, нажав кнопку «Сделать копию».
Заполняйте таблицу. Первые 4 столбца — год, месяц, день и время начало события. Следующие 4 столбца — год, месяц, день и время его окончания.
День и время указывать не обязательно. Можете пропустить и столбцы, когда мероприятие закончилось.
Следующий столбец — для указания дат в особенном формате, который не соответствует рамкам предыдущих колонок, например: «январь — февраль».
Headline — это заголовок события. Text — его краткое описание.
Media — ссылка на фото, видеоматериал. Сюда же можно добавить embed-элемент. Например, код на карту, инфографику, аудио, загруженное на сервис SoundCloud, или пост из соцсети. Сервис «видит» посты из Твиттера, Фейсбука*, Инстаграма*.
Заполняйте столбы дальше: Сredit — источник медиа, сaption — подпись к нему.
Type — задайте у таймлайна титульный и финальный слайды (не обязательно). Group — позволяет показать события, связанные друг с другом. Background — позволяет задать фон для слайдов. Фон указывается цифровым кодом через # или ссылкой на изображение.
Опубликуйте таблицу. Нажимайте «Файл», «Публикация в Интернете». Затем во всплывающем окне кликните «Опубликовать».
Скопируйте из адресной строки ссылку на таблицу. Вернитесь в сервис Timeline JS. Полистайте до шага 3. Вставьте ссылку на таблицу в поле, чтобы сгенерировать таймлайн.
Настройте таймлайн. Кликните на «show» (в сером блоке рядом со словами Optional settings). Установите шрифт, язык таймлайна, укажите с какого слайда должен начинаться таймлайн, где будет находиться временная шкала: под или над событием и прочие настройки.
Чтобы получить код на таймлайн, листайте до шага 4. Вставьте ссылку на таблицу в Google в поле. В следующем поле (под словом «Embed») появится нужный вам код. Вставляйте его в нужную страницу вашего сайта или блога в режиме «текст» или «источник».
Кликнув «Open Preview in a new window», таймлайн откроется в новом окне. Эту ссылку можно расшаривать, например, в социальных сетях.
Так будет выглядеть таймлайн на сайте.
Создавая таблицу для таймлайна в Google, не обязательно все события указывать в хронологическом порядке. Важнее правильно указать даты, а сервис сам их выстроит по хронологии.
В таймлайн можно вносить изменения, дополнять событиями — вносите их таблицу в Google. Сервис обновит опубликованный таймлайн автоматически.
Временная шкала
《 Вернуться на главную страницу документации
Вы можете создать простую временную шкалу за несколько минут, используя наш шаблон электронной таблицы Google, и это краткое руководство, объясняющее
основной процесс. Эксперты могут использовать свои навыки работы с JSON для создания пользовательских установок, сохраняя при этом основной внешний вид и функциональность TimelineJS3.
Пример заполненной электронной таблицы см. в электронной таблице, на которой основан пример, на нашей домашней странице.
Работа с датами
Первые четыре столбца электронной таблицы ( AD ) — это дата записи на временной шкале. Вы можете просто ввести год или перейти к таким деталям, как месяц, день и даже время события. Вы должны ввести как минимум год, за исключением титульного слайда. (Чтобы ввести даты до нашей эры, используйте отрицательный год, например -500 )
У вас есть возможность добавить даты окончания (столбцы E-H ). Опять же, вы можете просто ввести год, или вы можете сделать его настолько подробным, насколько хотите. Даты окончания заставят TimelineJS отображать промежутки времени (также известные как эпохи) в нижней части.
временной шкалы. Если у вашего мероприятия нет «даты окончания», оставьте это поле пустым — вам не нужно повторять дату начала.
Если вам нужна большая гибкость в отношении того, как даты отображаются на слайде, вы можете использовать столбец I , чтобы указать «отображаемую дату», которая переопределит любые решения TimelineJS о том, как отображать дату. Это может быть полезно, если фактическая дата неизвестна, но вам все равно нужно указать какую-то дату, используя один или несколько предыдущих столбцов (A-H), чтобы TimelineJS знал, как отображать ее относительно других событий. Если вы используете этот столбец, используется дата отображения на слайде, где он указан, и на метках кнопок «следующий» и «предыдущий», которые ведут к этому слайду.
Добавление текстового содержимого
Столбцы J и K электронной таблицы содержат заголовок и основной текст, которые будут отображаться на каждом слайде временной шкалы. Вы можете использовать простой HTML в этих полях, чтобы оформить текст или сделать ссылку на
другие страницы в Интернете. Часть HTML может быть удалена или изменена из соображений безопасности.
Ни «заголовок», ни «текст» не являются обязательными, но мы рекомендуем включать хотя бы заголовок, так как он также используется в инструменте навигации по временной шкале для маркировки маркеров.
Добавление носителя (опционально)
TimelineJS может извлекать мультимедиа из различных источников и имеет встроенную поддержку Twitter, Instagram, Flickr, Google Maps, DropBox, DocumentCloud, Wikipedia, SoundCloud, Storify, iframes, основных видеосайтов (YouTube, Vimeo и т. д.) и более. Узнайте больше о типах мультимедиа, с которыми работает TimelineJS.
У вас есть возможность добавить медиафайлы к слайдам в столбцах LO . Под Столбец Media ( L ) введите ссылку (URL) на носитель, который вы хотите отобразить. TimelineJS поддерживает несколько типов мультимедиа. В следующем столбце ( M ) вы можете указать исходный источник медиа, а в столбце N вы можете включить краткую подпись. Как и в случае с текстом и заголовком, вы можете использовать базовый HTML для форматирования и связывания в
столбцы кредита и заголовка ( M и N ).
В следующем столбце ( M ) вы можете указать исходный источник медиа, а в столбце N вы можете включить краткую подпись. Как и в случае с текстом и заголовком, вы можете использовать базовый HTML для форматирования и связывания в
столбцы кредита и заголовка ( M и N ).
Если TimelineJS не поддерживает тип мультимедиа, который вы хотите использовать на слайде, вы часто можете обойтись, введя Разметка